How to add some professional polish to your Facebook Lives
There’s some really simple and easy tools to use to create more professional Facebook Lives easily.
I will talk you through in this blog post and video.
This kind of technology helps you to be more organized in your Facebook lives, and helps alleviate “brain freeze” and the worries that “you don’t know what to say.”
What is BeLive?
BeLive is streaming software that enables you to go live on Facebook, and also interview guests and add your own branding.
Belive.com works on both mobiles and desktop but the mobile version isn’t always very stable, so be prepared to use the desktop.
It’s a great way to feature guests, and get more interaction, and host webinars.
If you’re nervous about speaking on camera, this is a perfect way to have a chat with someone about their business, or get a testimonial from a client. You could also include a training session, and you don’t have to always be in shot!
_______________________________________________________
New here? I write about video marketing, confidence on camera and YouTube. Here’s some more blog posts that might help you:
- Why Facebook Ads Work for your Business
- How to be More Effective with Video
- How to Use Video to Grow Your Business
- How Facebook Live can help you scale you business
- Make your business more effective with video
- How to Create a BeLive Facebook Live
- Improve your Facebook Lives
- How to adapt your business to the new Facebook changes
_______________________________________________________
TRIAL IT BEFORE YOU BUY
You can trial the software for 14 days for FREE and test and see if you like it. The more you spend, the more that you can do, and the greater flexibility and support you get. But test it and see if you like it before you spend.
This technology is about a year old, which in tech terms is positively middle-aged, but it’s sometimes a bit glitchy. If it fails, just log out, and log back in again.
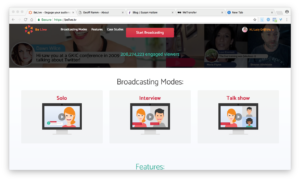
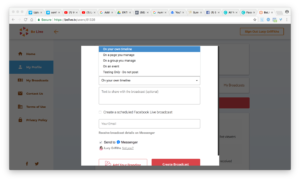
How to Start Going Live
Click on the “Start Broadcasting” option.
You’ll be taken to a page to choose what kind of broadcast you want to host:
- SOLO – For webinars and for your standard Facebook Live
- INTERVIEW – bring guests on board and have interiews or chats using Facebook. This is also a great way to record a podcast at the same time.
- TALK SHOW – Bring a host of guests on board your Facebook Live and also incorporate still images, and presentations on screen.

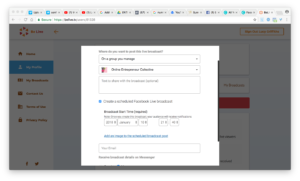
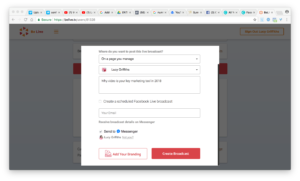
Step two
Once you’ve selected the style of broadcast – solo, interview or talk show, the following screen then pops up.
You can then choose to host your live on your personal page, your group or your business page….
Or you can do a trial run first for the more cautious.
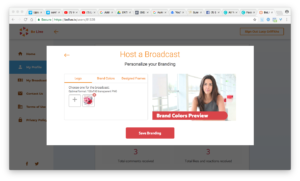
Branding your Facebook Lives
You can add text about the broadcast, and also name the broadcast for both your guests, and so that you can recognize what the live is about.
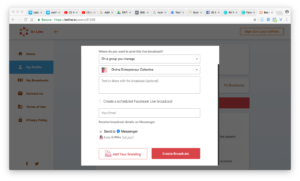
Afterwards click on “Add your branding”.
This is where you can create straplines known as “lower thirds” that enable you to look more polished on screen, and really finesse the impression of you on Facebook Lives.
You can choose your brand colours from your branding hex codes.
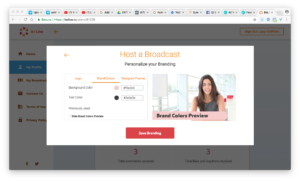
You can also add your logo on screen.
You can also add fun frames to your Facebook Lives and pretend that you’re at the seaside or the beach… or even on the moon!
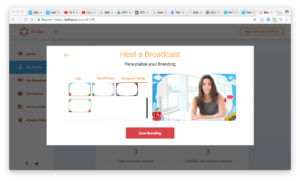
Then click on “Save Branding”
When you’ve completed all the sections, click on Create Broadcast.
Clicking on “Create Broadcast” can be problematic – if it doesn’t seem to be working, then refresh, and perhaps log out, and log back in. On occasion, I have had to reboot my laptop.
Once you’ve clicked on “Create Broadcast”, the following screen will appear and scroll down for the “start” button.
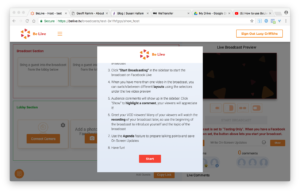
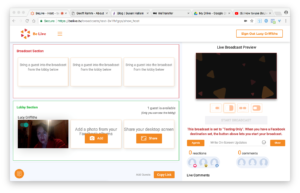
Add more Creativity in your Facebook Lives
Click on “start” and you’ll be taken to the “Broadcast Section”.
This is where you get more creative in your broadcasts.
If you click on “Connect Camera” you will show up on screen in the lobby area.
You can also add images from your Facebook albums for training sessions, and to improve your graphics on screen. Click on “Add a photo from Facebook”.
Click on “share your desktop screen” to enable you to then share your screen for a particular webinar.
Get everything lined up so that you’re all ready before you go live, and think about the order for your broadcast. For example, you may want to go live, then have a graphic after an introduction, and then go back to you, and then go to the desktop screen for the webinar.
Be your own production manager, and have this listed and lined up.
I find this helpful to keep me on track for lives and I save this in the “Agenda” area.
SHOW TIMINGS
00:00-00:25: Intro video
00:25-00:32 video promo for show
00:32-00:35 Title graphic of show
00:35-01:10 Intro to subject
01:10-05:00 Screenshare of desktop
05:00-05:30 wrap up
The Agenda area is also useful to write questions if you have a guest on the show, and avoids brain freeze!
The only thing left to do is to click on “Start Broadcast” and go for it!
You will be amazing! I can’t wait to see how you get on.